HOME > PRODUCTS > ARROW PREP > BASIC FLETCHING INSTRUCTIONS & ADHESION TROUBLESHOOTING
Use caution to not cut yourself on sharp surfaces.
BASIC FLETCHING INSTRUCTIONS
- Make sure your jig is properly set-up so that the base of the vane is completely flush with the shaft. Test this by putting a vane and shaft in the jig WITHOUT any glue and adjust it as needed.
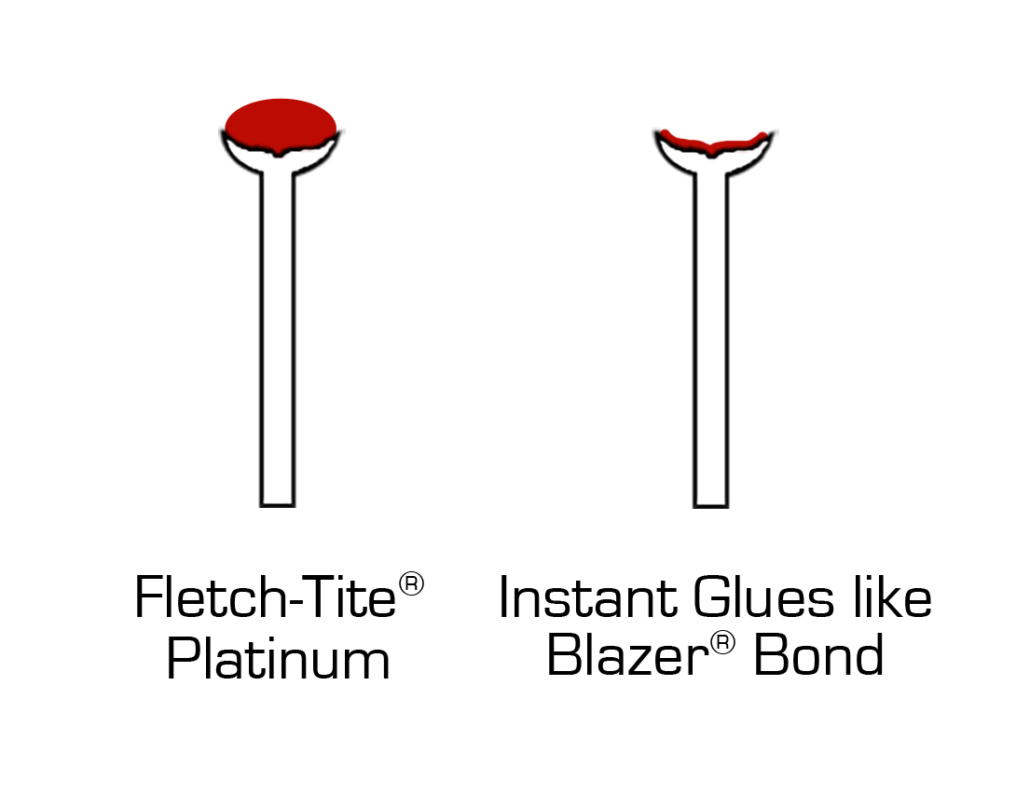
- Seat vane securely in the clamp. Apply Bohning glue to vane base. See the illustration to the right to determine appropriate quantities of glue.
-
- For Fletch-Tite Platinum, using a steady stroke, fill the entire length of the vane base with a bead of glue. If there is an excessive amount of glue squeezing out from under the vane after removed from the jig, use slightly less during the next application – very small amounts of glue squeezing out are okay though.
- For instant glues, dab the base of the entire length of the vane using small dots of glue. If there is any glue squeezing out from under the vane when removed from the jig, use less during the next application.
-
- Follow jig instructions for specific arrow shaft insertion, etc. Allow proper clamp time in the jig according to glue instructions.
- Carefully remove arrow from jig, dot tip and tail of vane with a small amount of glue for added security, and allow proper cure time according to glue instructions.
FLETCHING WITH A HELICAL/OFFSET
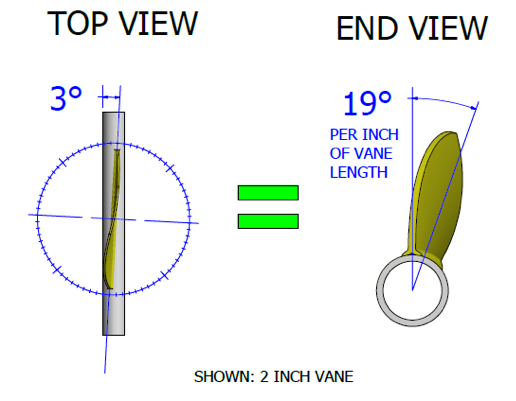
Manufacturers use different ways of classifying helicals/offsets, which can be confusing when making comparisons. First of all, let’s clarify that helicals and offsets are essentially the same thing. A helical is defined as any vane angle that is not a 0° straight fletch. An offset is, quite simply, a minor helical and usually refers to anything between 0° and 2°. A vane that is fletched at greater than 2° appears more twisted due to way it wraps around the shaft, however, a vane fletched at less than 2° still has a helical “twist,” it is just less noticeable. There are two main ways to specify the degree of an offset /helical. Figures A and B show the same helicals represented in different ways.
1) Top View of the shaft: this is the classification used by Bohning & most other manufacturers, in which offsets/ helicals are measured independent of vane length.
2) End View of the shaft: this is the measurement system used by some jig manufacturers in which the offset/helical is given per inch of vane length (eg 10° /inch), making the values appear higher. Note – measurements in this system can vary with arrow diameter.
ADHESION TROUBLE-SHOOTING
PREVENTING ADHESION PROBLEMS
• Proper shaft prep is very important for strong adhesion. Reference Cleaning Your Arrow page.
• Follow all instructions and allow proper clamp and cure time for adhesives.
• For best results with Fletch-Tite Platinum®: fletch arrows and allow to cure in a controlled climate with low humidity (30-50% relative humidity). If humidity is too high (especially above 70% relative humidity) we recommend fletching with an instant adhesive such as Blazer® Bond or Fletch Fuse.
• Make sure none of these items are in your fletching area: Silicone-based aerosols, carbon dust, oils, chemicals, pet hair, food, beverage, etc.
• Use the correct amount of glue on vane base.
• Clean jig clamps/arms frequently with acetone to prevent CA adhesive build-up (which impedes downward pressure).
• Ensure your adhesive is still viable.
IDENTIFYING ADHESION PROBLEMS
If your vane has fully or partially separated from the arrow shaft, the following scenarios may help you narrow down the cause:
Adhesive is on the shaft, vane base is free of adhesive: usually indicates a problem with vanes. Some brands of vanes are manufactured using a release agent and must be cleaned prior to fletching. Other brands require the application of a primer to the vane base prior to fletching. Bohning vanes do not require either of these steps as they come with primer already applied to the base – for this reason we recommend that you NOT CLEAN YOUR BOHNING VANES.
Adhesive is on the vanes, arrow shaft is free of adhesive: usually indicates a problem with the arrow shaft. Repeat the arrow cleaning procedure on our Cleaning Your Arrow page and try again. Some shafts need additional abrasion. If all else fails, the best solution may be to use a wrap or to dip the arrow shaft.
Adhesive is on both vane and arrow shaft: could indicate a jig improperly set up, inadequate clamp time, or a damaged clamp (if you have numbered your clamps, look for a pattern in the failure). It could also indicate that the glue has not been allowed to cure for the recommended amount of time prior to shooting, or that there is a contaminant on parts of the shaft or vanes.
Still experiencing issues? Have more questions? Please email [email protected] or call 231-229-4247 and we will refer you to our in-house chemist.